AI HTML tools have transformed how developers identify and fix coding mistakes, turning what used to be a tedious manual process into something that happens in seconds.
Whether you're a beginner struggling with unclosed tags or an intermediate developer chasing down a mysterious layout bug, an AI-powered editor can spot the problem before you even finish typing.
The stakes are real: broken HTML leads to accessibility failures, SEO penalties, and frustrated users who bounce from your site. According to recent studies, nearly 90% of websites contain HTML validation errors, many of which go unnoticed until they cause visible problems.
This guide walks you through the practical steps of using AI HTML editors to catch and correct the most common coding errors fast. You'll learn exactly what these tools detect, how to configure them for your workflow, and which error categories matter most. By the end, you'll have a repeatable process for writing cleaner code with far less effort.
Key Takeaways
- AI HTML editors catch unclosed tags, nesting errors, and attribute mistakes automatically.
- Real-time scanning means errors get flagged while you type, not after deployment.
- Configuring severity levels helps you prioritize critical fixes over minor warnings.
- Accessibility and SEO errors are detected alongside structural HTML problems.
- Pairing AI suggestions with manual review produces the cleanest, most reliable code.
Step 1: Understand What AI HTML Editors Actually Detect
Structural Errors
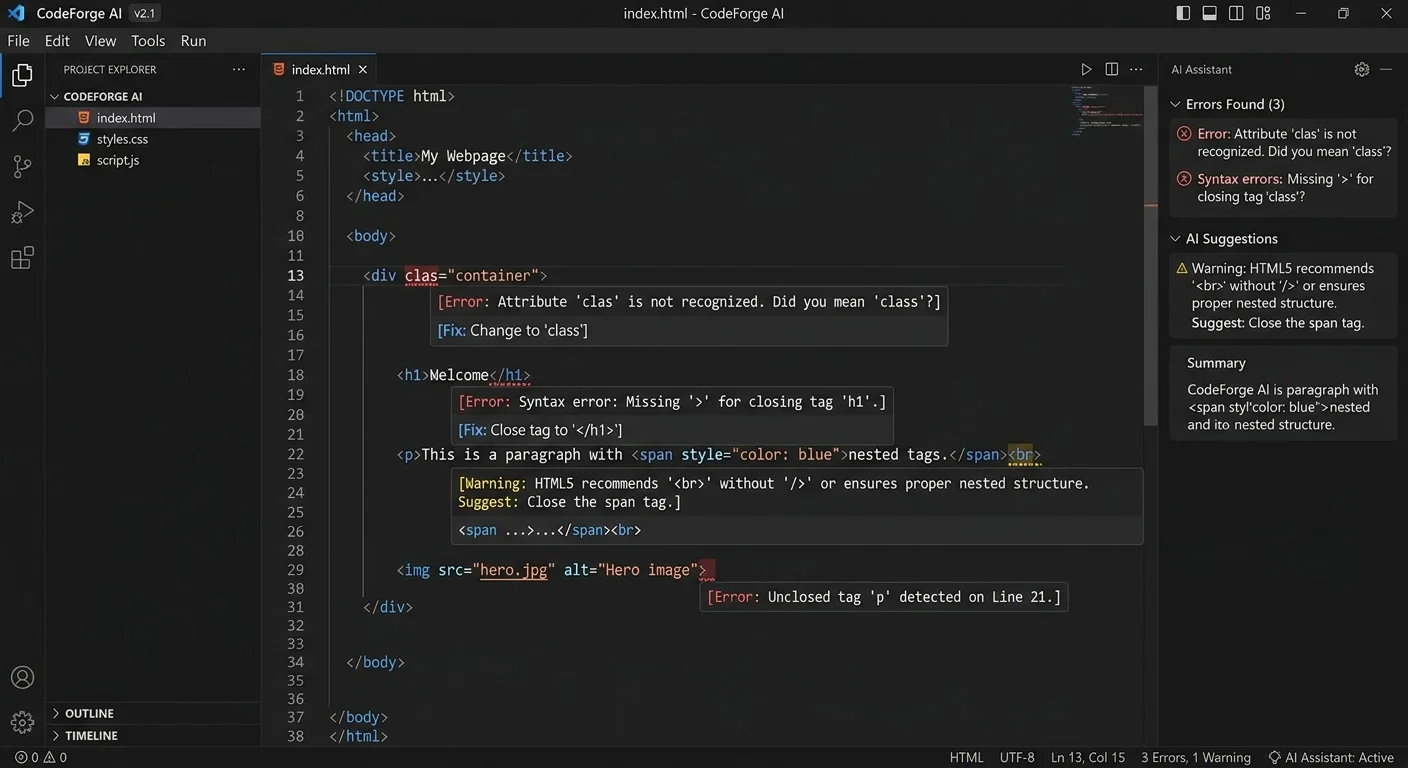
The most common HTML mistakes are structural: unclosed tags, improperly nested elements, and missing required attributes. A stray <div> without its closing counterpart can break an entire page layout. Traditional linters flag these issues too, but AI HTML editors go further by understanding context. They recognize that a missing </li> inside a nested list is different from one in a flat list, and they adjust their fix suggestions accordingly.
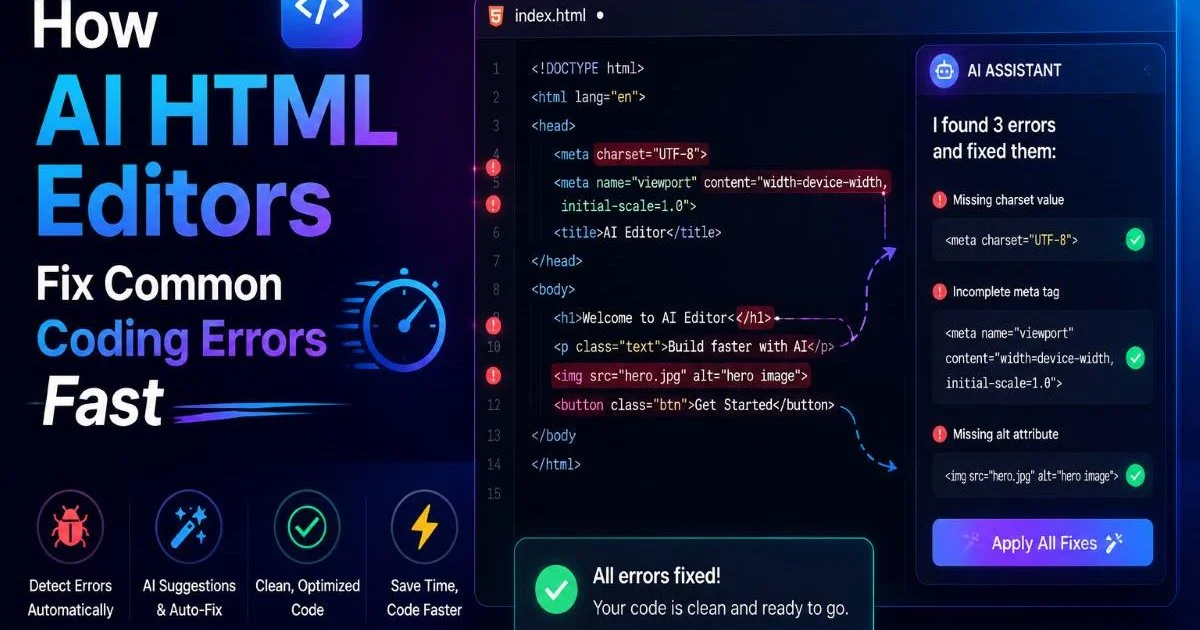
Consider a real example. You write a navigation menu with five list items but accidentally close only four. A basic validator tells you the document is invalid. An AI-powered editor like VEX, the AI-powered HTML editor, pinpoints the exact line, explains why the tag is missing, and offers to insert the closing element in the correct position. That level of specificity saves minutes on every single error.
Duplicate IDs represent another structural problem that trips up developers regularly. Screen readers, JavaScript query selectors, and CSS all expect unique ID values. When two elements share the same ID, behavior becomes unpredictable. AI editors flag duplicates instantly and suggest alternative naming conventions based on the surrounding element context, which is far more useful than a generic "duplicate ID found" message.
Semantic and Accessibility Issues
Beyond structure, AI HTML tools detect semantic problems that affect how search engines and assistive technologies interpret your page. Using a <div> where a <nav> or <main> element belongs, skipping heading levels (jumping from <h2> to <h4>), or omitting alt text on images are all errors that these editors catch. These issues don't always break visual rendering, but they damage accessibility scores and organic search performance significantly.
Missing form labels are a particularly common accessibility failure. An AI editor scans your form markup and identifies every <input> that lacks an associated <label> element, then generates the correct label markup based on the input's name or placeholder text. For teams working under regulatory requirements like the EU AI Act, understanding how AI tools handle compliance matters. You can explore those regulatory dimensions at this EU AI Act compliance guide.
Run your AI editor's accessibility scan separately from structural checks to avoid overwhelming yourself with errors.
| Error Type | Frequency in Audits | AI Detection Rate | Manual Detection Rate |
|---|---|---|---|
| Unclosed Tags | Very High | 99% | 75% |
| Missing Alt Text | High | 97% | 60% |
| Duplicate IDs | Medium | 98% | 40% |
| Improper Nesting | High | 95% | 55% |
| Deprecated Elements | Low | 93% | 70% |
| Missing Form Labels | High | 96% | 35% |
Step 2: Configure Your AI Editor for Maximum Accuracy
Setting Severity Levels
Most AI HTML editors let you configure error severity into categories: critical, warning, and informational. Critical errors include things that break rendering or accessibility, such as unclosed tags or missing document type declarations. Warnings cover issues like deprecated attributes that still work but should be updated. Informational notices flag style preferences, such as using self-closing syntax on void elements. Setting these levels correctly prevents alert fatigue.
Start by setting your editor to show only critical errors during initial development. This keeps your focus on structural correctness while you build out the page. Once the skeleton is solid, enable warnings and informational messages for a second pass. This two-phase approach mirrors how professional development teams handle code review, and it prevents the common trap of fixing trivial issues while a broken layout goes unnoticed.
Default severity settings vary between editors. Spend five minutes reviewing your tool's configuration before your first real project.
Choosing Rulesets and Standards
Your AI editor likely supports multiple HTML standards: HTML5, XHTML, and sometimes custom rulesets for frameworks like React or Angular. Selecting the right standard matters because rules differ between them. In XHTML, every attribute needs a value (disabled="disabled"), while HTML5 allows boolean attributes (disabled alone). Running HTML5 code against XHTML rules generates dozens of false positives that waste your time and erode trust in the tool.
If you work with a content management system or a template engine that injects its own markup, consider creating a custom ruleset that ignores known template syntax. For instance, handlebars expressions like {{variable}} will trigger errors in a strict HTML parser. Custom rules tell the AI to skip those patterns. If you also need to strip existing HTML before feeding it into your editor, tools like the best HTML stripper can clean raw markup before analysis begins.
Step 3: Fix Error Using a Repeatable Workflow
One-Click Fixes vs. Manual Corrections
AI HTML editors typically offer two fix modes: automatic one-click corrections and guided manual suggestions. One-click fixes work well for straightforward problems like adding a missing closing tag or inserting a required alt attribute with placeholder text. They're fast and accurate for isolated issues. But for complex problems, like restructuring a deeply nested table or refactoring a form layout, you should review the AI's suggestion carefully before applying it.
Here's a practical rule of thumb: accept automatic fixes for any error that involves a single element in isolation. When the fix requires changing relationships between multiple elements (moving a <label> outside a <div>, restructuring list hierarchies), switch to manual mode. Read the editor's explanation, verify it against the HTML spec, then make the change yourself. This approach builds your understanding of HTML while still benefiting from the AI's speed in identifying problems.
"The best workflow isn't fully automated or fully manual; it's knowing when to let the AI fix it and when to fix it yourself."
Keyboard shortcuts accelerate this process significantly. Most editors bind "next error" and "apply fix" to single keystrokes. Learn these shortcuts on day one. A developer who navigates errors with mouse clicks spends roughly three times longer than one who uses keyboard navigation. That time compounds across hundreds of corrections in a large project.
Map your editor's "apply suggested fix" action to a single keystroke and practice it until it becomes muscle memory.
Batch Processing Multiple Files
When you're working on a multi-page site, fixing files one at a time is inefficient. Most AI HTML editors support batch scanning, where you point the tool at an entire directory and it processes every HTML file. The output is usually a consolidated report showing error counts per file, sorted by severity. This gives you a bird's-eye view of your project's health before you start fixing anything.
Prioritize files with the highest critical error counts first. A file with 15 critical errors likely has fundamental structural problems that cascade through the page. Fixing those first often resolves secondary warnings automatically. After addressing critical errors across all files, run the batch scan again. You'll frequently find the total error count drops by 30 to 40 percent just from fixing the top-priority issues, because many warnings were symptoms of those underlying structural breaks.
Batch auto-fix should only be used after reviewing a sample of the suggested changes. Applying fixes blindly across dozens of files can introduce new problems.
Step 4: Validate Results and Maintain Clean Code
Post-Fix Validation
After applying fixes, validate your output against an external source. Your AI HTML editor is powerful, but cross-referencing with the W3C Markup Validation Service confirms that no issues slipped through. Think of it as a second opinion. Run your corrected files through the external validator and compare results with your editor's report. Any discrepancies usually point to ruleset differences or edge cases where the AI made a judgment call that differs from the spec.
Browser testing is the final validation layer. Open your corrected pages in Chrome, Firefox, and Safari at minimum. AI editors fix code-level errors, but rendering differences between browsers can reveal problems that no validator catches. A <picture> element with correct markup might still display differently across browsers due to format support variations. Visual inspection in each browser takes only a few minutes and catches layout regressions that automated tools miss entirely.
Ongoing Maintenance Habits
Clean HTML isn't a one-time achievement; it's an ongoing practice. Set up your AI editor to scan files on every save. This real-time feedback loop catches errors the moment they appear, before they multiply. Developers who validate only before deployment often face dozens of accumulated errors. Those who validate on save rarely encounter more than one or two issues at a time, making each fix fast and low-stress.
Establish a weekly review habit where you run a full project scan and review the trend. Are certain error types recurring? If you keep writing duplicate IDs, you might need a naming convention. If missing alt text appears frequently, consider adding it as a required step in your content workflow. The AI editor's historical data, when available, turns these patterns into actionable process improvements that reduce errors over weeks and months.
Version control integration adds another maintenance layer. Commit hooks that run your AI HTML scanner before accepting a commit prevent broken markup from entering your repository. The scan takes seconds, and rejected commits include a clear error report so you know exactly what to fix. Teams that implement pre-commit HTML validation report significantly fewer production bugs related to markup issues.
Pre-commit hooks should mirror your editor's ruleset exactly. Mismatches between your local editor and the CI pipeline cause confusion and wasted time.
Frequently Asked Questions
?How do I configure severity levels in an AI HTML editor?
?Is AI HTML error detection better than a traditional linter?
?Does fixing HTML errors take significantly longer without AI tools?
?Can I rely solely on one-click AI fixes without manual review?
Final Thoughts
AI HTML editors have turned error detection from a chore into a near-instant process that fits naturally into your writing flow. The four steps outlined here, understanding what's detected, configuring your tool properly, following a repeatable fix workflow, and validating results, give you a reliable system for shipping clean code.
The technology handles the tedious scanning work, but your judgment still matters when deciding which fixes to accept. Build these habits now, and you'll write better HTML with every project you take on.
Disclaimer: Portions of this content may have been generated using AI tools to enhance clarity and brevity. While reviewed by a human, independent verification is encouraged.